Legend Of Kyrandia Companion
Welcome, dear reader, to the Legend Of Kyrandia companion. This page aims to give you instructions on how to finish the game, tips on how to deal with the labyrinth, and clear maps of the numerous large areas.
Contents:
General notes and tips
Walkthrough, Deaths
Inventory
Review
General notes and tips.
Legend Of Kyrandia has a relatively simple interface, with a single purpose cursor and a clear inventory. Click on a horizontally or vertically pointing arrow to proceed in a certain direction. Click on a regular arrow for, say, anything. Click on an object to pick it up. If you have a free inventory slot, you can put it in there and take it with you.
Tips:
- With the multi-purpose cursor, it can be too easy to, say, cross a broken bridge. Make sure you keep an extra save file handy and save whenever something looks risky.
- Inventory management becomes tricky: some items are not necessary for completion of the game. I'll state in the Inventory page what is necessary and what isn't.
- In the early stage of the game, pick up any gem you may find lying around.
- In the maze: drop berries in each and every room to prevent you from accidents.
- Die occasionally, just for a laugh.
Walkthrough
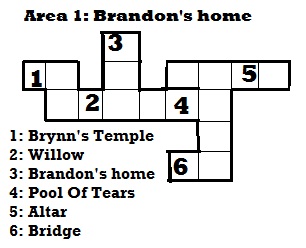
If you watched the introduction, you'll start in Grandfather's house; if you skipped it, you'll have to go up two screens. In Grandpa's house, pick up the letter on the desk, the saw in the corner, the red garnet on the table and optionally the apple in the vase next to the bed. You could eat the apple if you wish. Leave the room and watch the scene.
Go 2 screens to the right, click the pond and catch a tear. Go right 1 screen and take the gem. Move to the bridge, talk to Herman and give him your saw.
Walk to the altar, pick up a rose.
Walk to the tree, put the tear on the hole in it. Then follow the boy, right three times, then up. Take the marble.
Walk into the Temple, talk to Brynn, give her your letter, give her the rose and pick it up after she turned it to silver. The note may be dropped now.
Go to the altar. Put the marble on it to fixit, then place the rose on it to receive the amulet in your inventory. Then go to the bridge and cross it.
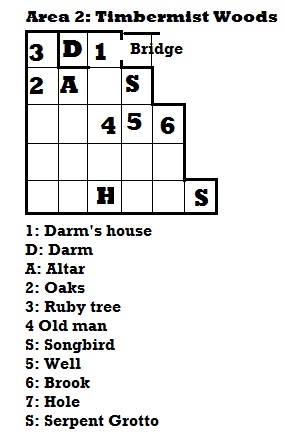
Go left, left, talk to Darm. He'll send you to get a quill. Walk south two times and talk to the man: he'll tell you to sow if you want to harvest. Go to songbird: there's a walnut there. Go to the oaks (and on the way, you may want to leave some gems at the altar). Get an acorn. Roam around the land to find other gems and a PINECONE. When you have the pinecone, put it, the walnut and the acorn, in the hole in the dying woods. The bush will give you healing powers.
Go to the songbird and click on the yellow stone in the amulet. The bird leaves you a quill. Take it to Darm. He'll give you a scroll and tell you something about stones and the altar.
In total you'll need 12 stones. You can get a ruby from the ruby tree (make sure to heal yourself after the snake bite with the amulet), a sunstone and a TULIP from the brook (click towards the bottom of the screen to find it), the garnet and peridot, but the remaining 8 must be found by scrounging the countryside: you may have to search all over the first land as well.
Once you have the sunstone, ruby, garnet, peridot, sapphire, diamond, opal, onyx, pearl, topaz, amethyst and aquamarin, take them all to the altar. Place the sunstone in the golden dish, observe what happens and save the game.
You'll need to find the 3 other stones that need to be placed in the correct order on the dish. This is random and can only be solved by trial and error.
Take the flute, play it a little. Then go to Darm and learn you'll need to traverse the Serpent's Grotto.
Enter the grotto: Malcolm will come out. As soon as you can, throw the knife back at him: anything else, even saving the game, is lethal.
Enter the grotto and save your game.
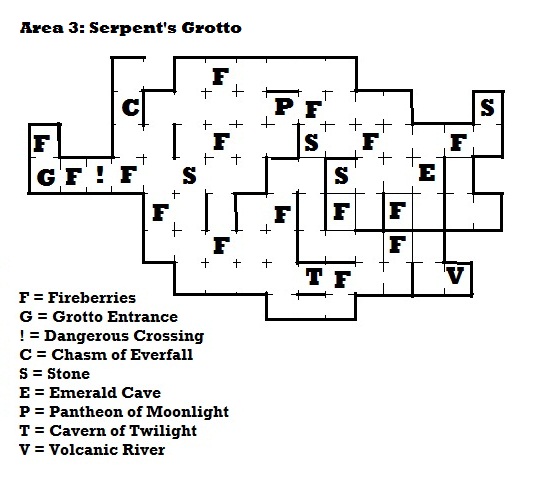
You COULD map the caves yourself, but you'll be on the brink of insanity if you do, so copy this one.
The caves are dark. If you are in a dark spot when you have no fireberries on you, you'll die. Fireberries will burn infinitely on the bush or on the floor, but you can only carry them for 3 screens. So, what's the strategy?
Leave all your belongings at the cave entrance. Pick 4 berries at the bush after the crossing, and drop 1 in each dark room you enter. Save your game if you have 1 berry left, and hope your next room has fireberries in it.
Another strategy I like to use: name or number all fireberry bushes on the map. Use a second save file at these bushes, and save it every time you have found something. In the save file, be sure to enter the location: since all bushes look alike, it's very easy to get lost, even with a map.
Marching around the caves, pick up 5 stones to open the front door. Four of them are marked on the map: the fifth is at the Cavern Of Twilight, sneakily hidden in the grey area at the right. Also pick up the gold coin.
Don't pick up the emeralds, they're dead weight. The llava river can be crossed using the scroll: behind it lies an iron key you'll need.
Go to the Pantheon and talk to the purple things.
Put the 5 stones in the dish at the treacherous crossing. Leave the cave, go to the well and drop the golden coin in it. You'll receive a moonstone. Put this in the Pantheon altar to get the power of flight. Use this to cross the chasm. Be sure to leave a berry in the room after that for easy return.
Let's check, do you have everything you need? If you want to continue the game, you'll need a red gem, a blue gem, a yellow gem, a yellow tulip from the brook, the iron key, the freeze scroll and 2 powers. If you are playing in the next land and discovered you forgot to drop a berry in the last grotto room, turn into a purple floater before entering the cave.Not sure if it works, haven't tried it yet.
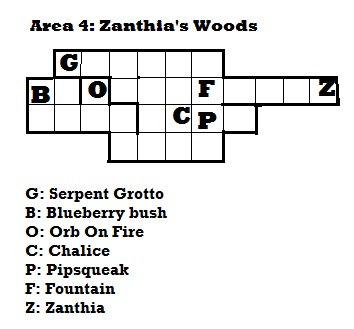
Pick up the apple.
Go three screens to the right. Wake up in the lab. Talk to Zynthia. She'll tell you to get water from the fountain. Take a bottle. Walk 4 screens to the left. Malcolm leaves. Walk to the fire bush, use the ice spell, get the orb. Now you can drop the scroll to save space. Pick a blueberry at the blueberry bush. Go to the fountain, click the chrystal on it. Fill the bottle. Click it on yourself. You now have DeMagnetizing Power. Fill it again. Give it to Zynthia. Give her the blueberry. She'll tell you to get a fresh one. Go do that, then return only to find her missing. Drop the berry, tulip, gems and flasks. You'll need 4 of them in total, the lab provides you with an infinite number. Just leave, then re-enter to find a new one on the Flask Spot.
Then, move the rug to proceed to the next land.
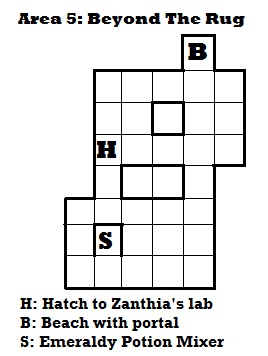
Pick up a red flower at the beach. Go back to the lab. Put a red gem and the flower in the cauldron. Fill 2 flasks with red liquid.
Put the tulip and the topaz in the cauldron. Fill 1 flask.
Put the blueberry and a blue gem in the cauldron. Fill 1 flask with blue stuff.
Go to the emerald potion mixer. Put a blue and a red potion in the openings to get a purple potion. Do the same thing with the red and yellow flask for an orange potion.
Go to the floating chalice, the grail-thing. Use your blue power to get it. Pipsqueak runs off with it. Go a screen to the right, make sure you have an apple, drink the PURPLE potion, enter, talk to Pipsqueak and give him your apple. Leave and take the grail out of the bush to the right. Now go to the beach and take an orchid.
At this point, you'll need the iron key, the chalice, the orchid, and 3 powers in your amulet. Don't continue unless you have all these things.
Stand on the beach and drink the orange potion.
When you've landed, go right to the grave. Look at it; it's your parents' grave. Place an orchid to talk to your mother and receive the power of invisibility. Go right, approach the gates with the dragons. Make yourself invisible and put the key on it. Enter the castle.
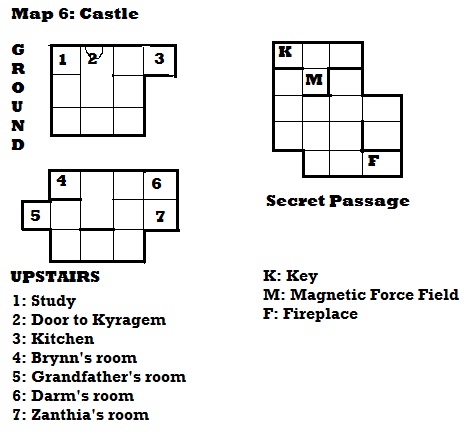
In the castle, there's much that's not needed: the bedrooms for instance can all be skipped. You'll miss landscape and jokes if you do. In Brynn's bedroom, you can pick up a fish you could eat, but you don't need it. The same goes for the ankh in Zanthia's room.
After Malcolm leaves, go upstairs, right, forward, left. Herman steps out with your saw. Click on the yellow force on your amulet. He'll fall asleep. Enter the room. Take the mallet next to the bells. Number the bells 1 to 4 from left to right, play 4 1 2 3 to move the painting up and take the golden key.
Go downstairs to the kitchen. Take the golden poker from the table: it's the royal scepter.
Go to the study. Let the book words spell "OPEN". Take the crown. Press the face on the fireplace to enter the secret passage.
Follow the map to go to the scene with the magnetic forcefield. Use your blue force to remove it. Then forward, left, click on the awkward tile and take the golden key.
The keys fit on the big doors in the hall. Click them on there and enter. Put the scepter on the left, crown in the middle and the chalice on the right pillow. The door opens and Malcolm appears. When he goes away, go in the room to your right. Make yourself invisible. Now move in front of the mirror on the right. Malcolm's spell bounces back at him and you've won the game!
MARCH TO DIE
- Try to cross the bridge before it's fixed, with or without Herman there.
- Getting bitten by the snake without curing yourself, you'll die in 3 screens.
- Getting turned to stone (or in the floppy version: knifed) by Malcolm at the serpent grotto
- Wandering in a dark part of the cave without berries or purple spell.
- Crossing the volcanic river without use of the scroll.
- Talking to the creature in Zanthia's pond.
- Drinking a green potion.
- Crossing the sea as a purple glob.
- Trying to pass Herman without the yellow spell
- Depending on your version, being in the Kyragem room without using the red spell.
Inventory
Garnet - Found on grandfather's table. Used in either Gemstone Altar Puzzle or Potion Puzzle.
Letter - Found on grandfather's table. Given to Brynn.
Saw - Found in treehouse, given to Herman
Apple - found in vase next to the bed in the treehouse. Could be eaten, or given to Pipsqueak.
Teardrop - Caught at the tear pond. Put in the willow.
Peridot - Found in the forest east of the tear pond. Possibly used in Gemstone Altar Puzzle.
Marble - Gotten from the little boy. Used to fix the rose altar.
Lavender Rose - Picked at the altar. Given to Brynn.
Silver Rose - Gotten from Brynn. Used on the rose altar.
Acorn - Found at oak tree. Put in hole to make bush.
Pineapple - Found lying around. Put in hole to make bush.
Walnut - Found at songbird. Put in hole to make bush.
Quill - Found after curing bird. Given to Darm.
Scroll With Icy Power - Received from Darm after you've given him the quill. Used twice: at the volcanic river and at the fiery bush.
Tulip - Picked near the brook. Used in the Potion Puzzle.
Diamond - Found lying around. Possibly used in Gemstone Altar Puzzle.
Opal - Found lying around. Possibly used in Gemstone Altar Puzzle. Possibly used in Potion Puzzle.
Onyx - Found lying around. Possibly used in Gemstone Altar Puzzle.
Sapphire - Found lying around. Possibly used in Gemstone Altar Puzzle. Possibly used in Potion Puzzle.
Ruby - Found in ruby tree. Possibly used in Gemstone Altar Puzzle. Possibly used in Potion Puzzle.
Aquamarine - Found lying around. Possibly used in Gemstone Altar Puzzle. Possibly used in Potion Puzzle.
Topaz - Found lying around. Possibly used in Gemstone Altar Puzzle. Must be used in Potion Puzzle.
Amethyst - Found lying around. Possibly used in Gemstone Altar Puzzle.
Pearl - Found lying around. Possibly used in Gemstone Altar Puzzle.
Sunstone - Found in the small stream after you've given the quill to Darm. Always used first in the Gemstone Altar Puzzle.
Magic Flute - Received after solving the Gemstone Altar Puzzle. Used to enter the Serpent Grotto.
Stone - 5 of them. Found in the cave and at the Cavern of Twilight. Used on the dish at Treacherous Passing.
Iron Key - Found behind the volcanic river. Used on the gates of the desert island.
Gold coin - Found at the Cavern Of Twilight. Tossed in the old well.
Moonstone - Received at the Old Well in exchange for the golden coin. Put in the Pantheon of Moonlight.
Emerald - Found in emerald cave. Serves no purpose.
Apple - Found outside the exit of the Serpent Grotto. Could be given to Pipsqueak.
Flasks - Gotten from Zanthia or found on the floor of her lab. Used to transport magic water or coloured potions.
Blueberry - Picked at Blueberry Bush. Can be eaten. Used in Potion Puzzle.
Chrystal Orb - Gotten from the fiery bush. Used to fix the fountain.
Magic Water - Gotten from the fixed fountain. 2 needed: Must be drunk and given to Brynn.
Rainbow Stone - Found in tree stump. No purpose.
Red Flower - Picked at the beach. 2 needed. Used in potion puzzle and on the grave.
Red Potion - 2 needed. Gotten after combining red gem and red flower in cauldron. Used to make purple and orange potion.
Yellow potion - Gotten after combining tulip and topaz in the cauldron. Used to make orange potion.
Blue Potion - Gotten after combining blueberries and blue gem in the cauldron. Used to make purple potion.
Purple Potion - Received at Emerald Mixer when blue and red potions are combined. Used to make you shrink.
Orange Potion - Received at Emerald Mixer when orange and red potions are combined. Used to turn you into a flying horse.
Green Potion - Received at Emerald Mixer when blue and yellow potions are combined. Can kill the player.
Chalice - Retrieved from Pipsqueak after you give him the apple. Used to enter Kyragem room.
Scepter - Found in castle kitchen. Used to enter Kyragem room.
Crown - Found behind fireplace in study. Used to enter Kyragem room.
Golden key 1 - Found in room upstairs after playing the right tune. Used on double doors.
Golden key 2 - Found in secret passage. Used on double doors.
Fish - Found in Brynn's room. Can be eaten. Serves no purpose.
Ankh - Found in Zanthia's room. Serves no purpose.
YELLOW force - Healing. Gotten from the bush you grew. Used on songbird on yourself after the snake bite, and on Herman in the castle.
PURPLE force - Weightlessness plus glowing. Gotten at the Pantheon of Moonlight. Used to cross the chasm.
BLUE force - De-magnetizer. Used to get the chalice and to remove the magnetic field in the secret passage.
RED force - Invisibility. Received from mother. Used to enter the castle and in the final room.
Review
Here is a game that has potential, but leaves a lot to be desired. The inventory management is great, but with the all-purpose cursor making it a bit easy, the game makers had to resort to bizarre trial-and-error situations to add body to it. The first section is very manageable, but all the rummaging for gems wasn't too enjoyable. I stumbled on the plant solution entirely by chance, but it's a bizarre puzzle. It continues with the trial-and-error gem puzzle, leads into a very frustrating trial-and-error maze with the added berry handicap. At this point I had had it, and didn't bother to solve much of the remaining puzzles myself: at that point, the unsuspecting player still has the random-potion-mix with matching gem search, the quest for the emerald potion mixer in a maze, the whatever these drinks do, the bringing of the flower, the maze of the castle's secret passage and the three royal objects puzzle still to go.
Fortunately, the game looks gorgeous. The willow puzzle is wonderful and a true feel-good movement. There is room for a little extra, particularly the castle bedrooms and numerous deadweight objects. This adds to the fun, but sadly, the all-purpose cursor doesn't give much freedom. It has gotten me killed a number of times, since Brandon won't look at the volcanic river: he'll walk over straight away.
The characters? I didn't like Brandon much, he's very boastful which annoyed me. Some of the jokes were much too stiff, such as "for surely she has dressed you". What didn't help was that much of the voice acting is highly annoying and unconvincing. Brandon, Brynn and Zynthia suffer this strongly. Worst offender would be Brandon's mother. Here you have a scene that could move to tears: but it can't, too deadpan. Sometimes, the texts don't help either. Particularly the final scene is something to grind teeth at.
It should work: but it doesn't cases: why doesn't the apple work for making a potion? Why does the invisibility spell fail if you try to use it to pass Herman? Why can't I put a few more flowers on the grave?
In all, a decent game, but no more than that. 6/10.